
All you need...
... a needle ...foam ...wool ... maybe a needle holder
... a needle ...foam ...wool ... maybe a needle holder

|
|
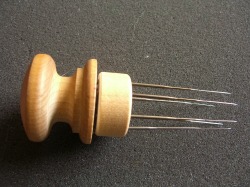
Needle holder
|
How to felt with a needle
(There is also 'wet' felting, not explained here)
The needle is very sharp and if you are not careful you will stab your fingers. (Actually, you will stab yourself, it pretty much comes with the territory…). Store it safely. Keep bandaids handy.
The end point of the needle is fragile enough to break off if you punch it down and then
bend in another direction. If you need something to push the wool around with, it is helpful to keep a thick sewing needle nearby for that. It is also good to have little embroidery scissors handy, and toothpicks to roll wool unto when you make animal legs.
You need the foam as a surface to punch your needle into. Lift up your project from the foam now and then, or it tends to get stuck and woven into the foam. Any foam does not work, some break of little pieces. There also is now some brush like things to put your wool on top, I haven't tried that.
To make 3D creations bendable, you can felt around pipe cleaners. For added stiffness you can use steel wire, but it has to be anchored into the wool by loops, or else it might just slip out.
For creations that are top-heavy or generally wobbly, I've taken to put a glass marble inside the bottom to help stability.
The technique is simple, you just keep poking and punching, jab and stab, but you have to cover every millimeter, from different directions, to make it really firm.
Needles come in different gauges. The all-around is the 38 gauge triangular point, there are also coarser (36 gauge) and finer (40 gauge), and there can be different numbers of notches on the end, and star- or triangular shaped points. You can also buy holders that can fit several needles for more efficient punching.
More needle info from paradisefiber.net:
FELTING NEEDLE GUIDELINES
A. Needle gauge.
There are different sized needles for different projects. The 32 gauge is for needling hair onto vinyl dolls and for needling coarse fiber such as Karakul. (I call this the coarse needle.) The 36 gauge needles are used for needling medium fleece such as Romney or Cotswold. (I call this a medium needle.) There are also 40 and even finer gauge needles. The higher the number with wire (as with thread), the finer the diameter. So 40 is smaller than 36. I use the 40 for needling very fine fibers and for needling fine pre-felts onto silk cloth backgrounds. (I call this needle the extra-fine needle.) I use the 38 for merino fibers and call it a fine needle. I like this needle for needling merino pre-felts onto a cotton cloth ground. The coarser needles are good for preliminary work, doing the deep penetration necessary to “rough†in a sculpture for instance. The finer needles are better for detail work done when the felt is already partially hardened by the coarser blades. You do not need to penetrate deeply into the felt surface to add details and the finer gauge leaves less of a hole.
B. Blade style.
While there are several blade styles, there are two blade styles that most needle felters use. The most common is the triangular blade. This blade is shaped like a leather needle, with three sharp edges. The notches are along these sharp edges. The other type of blade is the star blade. This one has four edges and is shaped somewhat like a star. There are more notches since there are more than 3 edges. This needle is good for helping to attach fine fiber to cloth. It is also good for detail work.
C. Notch placement and depth.
On some needles available to us, the notches are placed about 1/8 inch away (3.2 mm) from the point and on others, the notches are placed about 3/8 inch away from the point. If the notches are closer to the point, you won’t have to push down with as much effort to start getting the fibers to tangle.
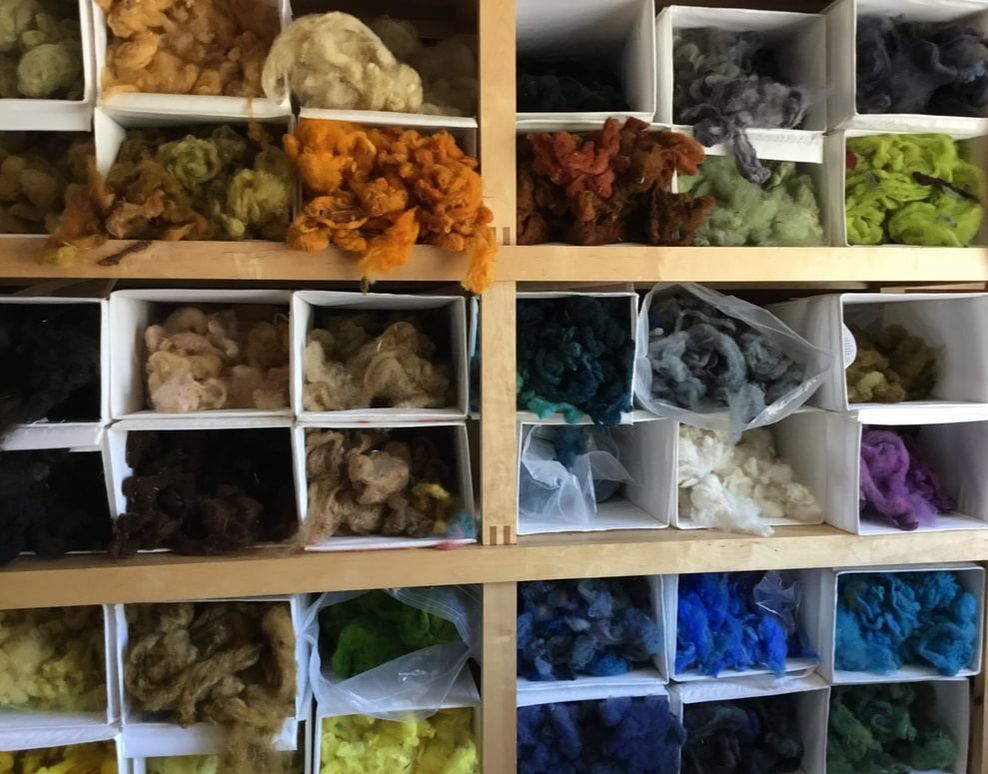
My wool comes from Romney sheep in a vineyard in Sonoma. It was 'raw' fleece that I have washed (there is both dirt and lanolin to get out) by soaking in hot soapy water for an hour, and repeating until clean), dyed (with acid dye that you cook on the stove) and combed by hand. To get the wool whiter I had to soak it in hydrogen peroxide. It takes a lot of time, but the process makes you "bond' with your wool. My sheep seem to have roamed around a lot and their wool was full of mainly 'foxtails' (a very clever seed that can dig into everything, even pets, as my family has experienced through vet bills), but also a variety of burrs and other pieces of the great outdoors. There might still remain some bits and pieces in the wool and you will have to try and pick it out (sometimes I use tweezers).
When you buy wool commercially it will come in 'rovings'. It is nicely combed wool, very smooth and even, without short parts and totally clean. There is superfine wool, like Merino, which is actually a bit too fine for felting. I bought some 'Corridale' when I started out. It is also quite fine compared to my Romney. Well, if you get into it, you'll find out what you like best.
There are wool combs (seems to cost around $ 120 on the web), I made some from steel combs (Afro style, with long sharp points) from a beauty supply store, taping two together for $ 5. An Australian wool book recommended dog grooming combs. Combs are good for the cleaning process, getting bits and pieces out, and also generally for 'fluffing up" the wool.
Well, that should get you started, so have fun, because it is!
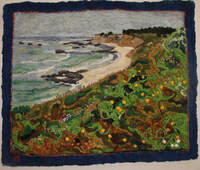
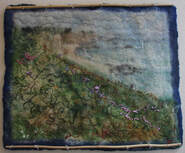
Making felted wool hangings
You can felt on top of various material: you can make a piece of wet felted wool, you can buy ‘prefelt’ or use some other loosely woven fabric, like linen. Underneath this you need foam, and it will get deformed and destroyed in the process, so then you buy new foam. First I was using cheaper packing foam, but now I’m using foam made for outdoor cushions that has bigger’ cells’ and takes longer before it has to be renewed.
You can felt on top of various material: you can make a piece of wet felted wool, you can buy ‘prefelt’ or use some other loosely woven fabric, like linen. Underneath this you need foam, and it will get deformed and destroyed in the process, so then you buy new foam. First I was using cheaper packing foam, but now I’m using foam made for outdoor cushions that has bigger’ cells’ and takes longer before it has to be renewed.
|
When you needle felt you will get a reverse fluffy image on the back and a lot of ends of yarns and thread from stitching.
While working on the wool and the underlying linen, you get a bit of deformity, so it is a bit of a challenge with 'squaring off' the finished work. As with knitting you might need to do some 'blocking', that is wetting and stretching. I use upper and lower pieces of flat wood or dowels in sleeves on the back to keep the edge straight. Besides sheep wool, I use alpaca wool, and sometimes Merino or other breeds. It's usually easier to use the Romney wool first and then finer wool is easier to attach on top. The alpaca wool is whiter the the Romney I have so it's good for clouds, waves etc. I also use silk, for it's white and shine, or dyed because of it's brightness. I collect all kinds of yarns, threads, bead, shells, wood pieces and miscellanous things to use in my paintings |
|
back
|